Monday, October 31, 2011

Out with the Old pt 1

Finally I have pictures of progress in our kitchen.  It has been a long journey, one that took much longer than we all expected.  I guess one has to live life as well as remodel a kitchen lol.  The hutch is complete, the kitchen cabinets (which was a surprise update) are finished.

This has been a labor of love, the hutch has been around as long as I have.  First belonging to my grandmother (it's at least 40yrs old), then lived for awhile in my aunts house, then moved to my uncles and currently our home and when Will & I find a place of our own it will move with us.  In other words she stays in the family.

Here she is in the beginning:


from top to bottom, as you can see she needed quite a cleaning.  The wood is very soft and was easily nicked.  For the most part she has been rather hidden, in our living room no less.  With the new kitchen we decided she needed more of a leading role & less of a walk on role.  So from the living room she was moved into the kitchen.

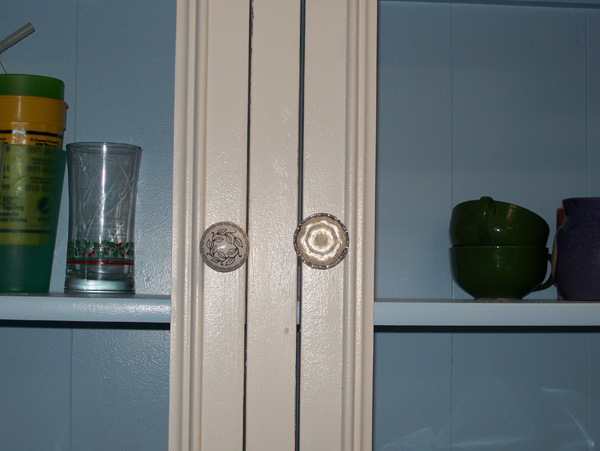
Here is the dilemma with the knobs.  The one on the right I bought for a desk I will be redoing later, we just wanted to see which would look better.  The off white knob with black vines or a big chunky glass knob.  Tho the picture is not great I think we made the right decision.  What do you guys think?

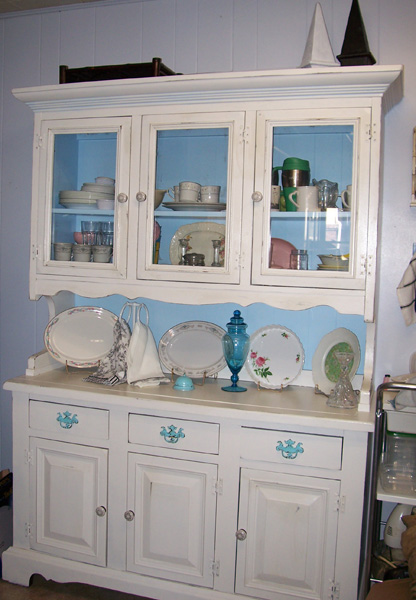
Here she is all finish:


She is still a work in progress as far as accessories go.  As you can see she got a nice white coat with blue accents.  I used Kilz primer, Antique White by Color Place and Clear Blue Sky by Glidden (though to be honest we had the color mixed in the cheaper Color Place paint.  If you get the right person working in the paint department they will mix it for you.  If not then you are stock with buying the $26 paint.  We are on a budge & I repeat we are renting. Some will warn that you will not get the right color if you use a different paint, that is to be expected so we did not worry too much as long as it was a close match.) However if you are going to go cheaper paint I would suggest getting Kilz stain blocking primer.  We had originally bought just a cheapy primer for $11 and we had a lot of bleed through on our walls.  I decided to bite the bullet & buy Kilz, WOW!! what a difference.  We only needed one coat of primer as opposed to 2 or 3.  So with that being said I also used the Kilz on the hutch since it was so old and has been around a lot of smoke.  The knobs I got from Hobby Lobby for $1.99 (50% off).  We decided to leave the drawers original hard ware though it is still a debate.  I spray painted them with Krylon Ocean Breeze, then distressed them.  However my OCD is kicking and I can clearly tell that the blue on the back of the hutch and the blue on the handles are two different colors.  Mom says she doesn't notice it and Will says it's "not that noticeable" but I notice.  We bought some nice drawer pulls for our cabinets that I've debated on going back & getting for the hutch, but that's for another post.

The plates displayed our various platters that we've either recently bought or have had.  The center platter is from my grandmothers china that we inherited with the hutch.  I wanted to give it center stage so to speak.  The platter on the left was also one of my grandmothers.  The rose dish I found for .50 cents at a thrift store & the plate was a project I've posted about.  The bell we've had forever, I sprayed it with Krylon Ocean Breeze & gave it a little distressing, as for the apocrathy jar I found at Goodwill for $1.50, I couldn't pass it up.  Will made me put back a clear one last week that was only $2.99.  I'm sure with time what is displayed will change, plus the very top of the hutch will be decorated as well.  I hate leaving all that empty space...empty.

Oh and before I close up I forgot to mention that I mixed some of the Clear Blue Sky with a bit of water washed the center of the lip with it, just to show the details better.  I'm still not sure about it, what do you guys think?  She also got a very light distressing, I didn't want to over do it since it is a family piece. Now that she is finished I'm am completely in love with her all over again.

Linking up to:

Photobucket Photobucket

shabby creek cottage

Sunday, October 16, 2011

Wheww! Long time no update.

So we have undertaken a large update for our kitchen.  Sure most of you are demolishing your kitchens and getting new...everything.  However as you all should know by now, we rent and therefore can't get new everything.  So instead of looking at that 1970's paneling any longer we decided to paint it, we also decided that it was time for that carpet (yes you heard me right, carpet) in the kitchen to come up.  We decided to go the cheap route & just lay those self adhesive tiles down.  Sure it's cheap but my God is the difference amazing.  We also got a new refrigerator and stove, in black.  I'm really liking how easy they are to keep clean.  I'll be sharing pics and updates ASAP.

We've also been doing a lot of thrifting.  I have found some great pieces for refurbing, I can't wait for the kitchen to be finished so I can get started.  I'll be sharing pics of all my goodies in the next couple days.  I would like to thank my fellow bloggers for all the great inspiration you've all been posting.  I found recipes for DIY Chalk Paint and chalk board paint.  I def. can't wait to try these out.  Keep doing what you do everyone, you're amazing.

Friday, September 2, 2011

Before & After

I thought I'd share a couple of my thrifty finds that I gave a new look to.

Before:
After:
It's the grey, white & blue striped bottle

Before:
cute find @ the local Goodwill. .99 cents a piece
After:


I like how in all three pictures the wall color looks different lol.  Silly flash.
as you can see I sprayed them a lighter color (Ivory) from Krylon, then sanded them a bit to give them a nice shabby look.  I really like how they turned out.  The bottom one is my favorite.

I literally had a spray painting debate in the middle of Goodwill when I bought these.  A lady came up to my cart & saw the plaques.  "ooh I love those" and I smiled & agreed I too liked them.  She then asked me what I was going to do with them.  I told her spray paint them a lighter color & then sand them a bit.  She got very vocal "oh no no no, no paint" as if I was a 5 year old.  She said the darkness was what made me so lovely.  For her maybe but for me it was the design.  I do not really like dark things & are living room area is shabby & light.  I was actually angry at the woman, don't look in my cart and then ask me what I will do with something if you aren't expecting an honest answer.  If she like them so much she should have put them in her cart, instead she walked past them.  So in this telling I suppose I'm just trying to state some like dark & some like light.  I notice a lot of people get upset when they hear you are going to paint something.  It's all a matter of preference, neither way is wrong.  I do not think I harmed the plaque's charm or loveliness by painting them.

Wednesday, August 31, 2011

Go to the Corner

Usually when someone hear's that, they've done something bad.  However this time it's a good thing, well at least for us it is.  Well it's an improvement, not so much a good thing I suppose.  Remember the little counter wall paneling I repainted a couple weeks ago?  Well I fixed the area up & it is looking pretty good right now.  I never took an original photo but that corner use to be where I huge oak tv stand was.  It's so large & we are rather outdated in the fact that we still have the tube televisions that you couldn't even see that corner area.  So it went from a rather invisible "oh this is your TV" to a lovely corner of the living room.

this was the wall after it was painted.

This is the area now all fixed up.
please ignore a.) the horrid footstool, I need to find material to recover it. I was just trying it out under there. b.) the blurred background.  There were pots on the stove lol.

We still need to redo the counter top but that is a future project.  I should have taken pictures of the huge pictures we hung on the wall as well.  Everything pictured we've had but they never really had a "place"  The table has been hidden under a tray.  You couldn't even tell it was a refabbed window.  As I said the footstool is getting recovered & painted.  So though it's not perfect yet it is quite in improvement from our bulky TV corner, plus a few wandering pieces found a home of their own in the pretty corner.

Thursday, August 18, 2011

I Have Conquered the Wall...well a mini one anyways.

Yesterday I decided to tackle that ugly little wall with the counter top on it.  I'm not sure what this is called or why it's even there.  We've debated on getting rid of it, but I fear the mess it will make.  None of us here are professionals & we are all heavy procrastinators to boot.  I can see it now, wood slivers sticking out everywhere.  So instead of dealing with that mess I decided that a little primer and a little paint could make this ugly wall into a wall that at least matched the living room.

We started with this:

This is actually the other side because once again I started without taking a before picture.

Then I primed this baby:
heck even this looked better than the ugly paneling.
Finished product:
Now that is better.  There are a few touch ups I need to make with the base board.

However as you can clearly see, anything is better than the before.  We'll be working on the counter piece in the near future.  For now it has been put on the back burner till we can afford to either have it replaced or paint it ourselves.  This apartment is truly a handful, but with the economy believe me it will be worth it in the end.

Any suggestions?  Should we lose this little wall or just leave it as is?  It separates the living room from the kitchen.

Sunday, August 14, 2011

The Non-Shabby Side

So I've made it pretty clear that most of our apartment is to be decorated in the "shabby chic" style.  I love pastel colors & distressed furniture.  However with that being said the one room in our house without a theme is our bedroom.  I have the blue walls I've dreamed off and with the black & white frames I've wanted displayed, however things are a bit eclectic in here.  The only real theme is my love for the artwork of Kurt Halsey.  However after stalking many bloggers lately I'm starting to feel my/our room is a bit to young.  I've spent a lot of money on this artwork and really hate letting it go, so I figured I'd sale off some small pieces and keep the big ones and start slowly adding some new artwork instead.

Today will be the fresh start the room needs.  I again forgot to take a before picture of a mirror I've had hanging in here.  In fact it was in my room before we moved only wearing different colors.  In it's first life it was an icky tacky gold color.  I spray painted it purple then when we moved I decided pink was my new favorite color and so it was painted ballet slipper color.  On my wall it has hung for about 10yrs now.  The other day I decided she needed to lose the mirror all together and get a white paint job (mainly white because I don't have black paint & I found these usually expensive black box shelves at Goodwill for $3.99).  Now she is all dressed & ready for her new debut as a frame.

Pictures to come soon.  I'll also be working on the top of our large wardrobe.  There is quite a bit of space up there  that needs filling up.  I'm waiting on a hand sander so I can sand it down & paint it. Anyone have any experience sanding down Ikea furniture?  Obviously this is not one of the natural wood pieces.  It's a nice large piece we got at the end of the last season for $49 marked down.  I'll update with a picture shortly.

Tuesday, August 9, 2011

While Waiting For the Paint to Dry

So I thought I'd share a couple of my other projects from the day of no sleep.  Some was done while waiting for the paint to dry on the cubby shelf while others happened before.

This plate is what started my marathon.  It was just a plain white plate with some major cracks & crazing in the middle.  I intended to turn it into a cake plate but when I was finished I felt it would be best used as decoration in the future refurb hutch.  Plus I don't think you can eat off of it.  No the Mod Podge is not perfect, but I don't like my shabby to be perfect.

Close up:
The middle is just a piece of scrapbook paper.

Next up was letter art.  I've really been wanting to buy some wooden letters to put over our window on the gray wall.  However finding the & was a bit hard, plus whenever I found one they would be out of an S.  Always the S never the W.  So after viewing some inspiration from one of the many DIY blogs I follow I decided to go the super cheap route...FREE.

Maybe one day when I can get out to a Hobby Lobby or The Flower Factory I can get all the wooden initials I need.  Till then I'm quite happy with how this turned out.  Thank you Photoshop

The last thing was to paint a icky dark wine bottle:
to white:

again I know it's not perfect and the Fleur de Lil stencil did not adhere so well to a rounded object, but I like it's imperfection.  It will later find a home on top of our wardrobe, once I find all the goodies I wish to place up there.